Translate text in .po files
Localization specialists use professional tools to translate real projects: CAT tools, TMS systems etc. To better understand the .po files structure, we will start with manual translation. After that, we will get acquainted with Transifex, one of the popular translation management systems.
Before you start, download the translation lists to get Russian and Portuguese translations of all texts.
Note
You can build the translated documentation at any time, even if the translation is not finished. This helps you see the intermediate result and understand how gettext works.
Manual translation
Let’s start from translating our texts into Russian:
Open index.po in locale/ru/LC_MESSAGES and find these lines:
#: ../../index.rst:2

msgid "The Zen of Python"

msgstr ""
The first line points to the source file and the exact line in it.
The second,
msgid, is for the source text itself; it also serves as a string ID.The third,
msgstr, should contain the translation of the string from msgid.
Put the translation to msgstr like this:
msgstr "Дзен Питона"
Do the same for other strings in index.po and easter-egg.po.
Note the escape characters in this string:
msgid "Although never is often better than \\*right\\* now."
Be careful to keep all such characters as well as the reST notation.
Here is the example of the above string in Russian:
msgstr "Хотя никогда обычно лучше, чем \\*прямо\\* сейчас."
Once you’re done with Russian, repeat the process with index.po in locale/pt_BR/LC_MESSAGES to translate it into Portuguese. For now, do not translate easter-egg.po, we will use Transifex to translate this file.
You can download an archive that contains .po files already translated into Russian and Portuguese (except for the Portuguese version of easter-egg.po).
Using Transifex
Sphinx documentation and Readthedocs describe Transifex integration using the Transifex Client. We will use another option: integration with GitHub via Transifex UI. For this, you will need your own copy of the demo repository on GitHub. The easiest way is to use the sphinx-intl-demo repository as a template. Note that easter-egg.po in locale/pt_br/LC_MESSAGES is intentionally left untranslated.
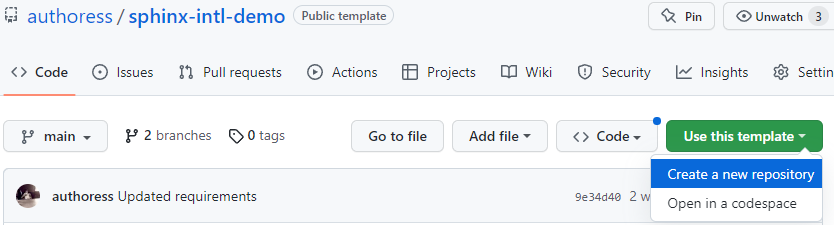
Creating a new repository from a template
Now you are ready to integrate Transifex into your translation process.
Create an account and organization
When creating an account, Transifex invites you to create an Open Source organization or join an existing organization. For our demo project, we’ll need a new organization.
Note
It doesn’t matter if you actually work for an organization or own one. On Transifex, organization is just a way to organize your projects.
In short, a user can be an administrator of an organization that owns some projects, and each project includes resources. Learn more about Transifex organizations, projects and resources.
Create a project
When you are done with the account and organization, Transifex invites you to create a project. For our demo project, specify the project settings as follows:
Project name: sphinx-intl-demo (choose another name if you want).
URL to open source license: specify the path to the license file in your GitHub repository. It should be something like this:
https://github.com/<your_account>/sphinx-intl-demo/blob/main/LICENSEProject type: File based.
Source language: English.
Target languages: Russian, Portuguese (Brazil).
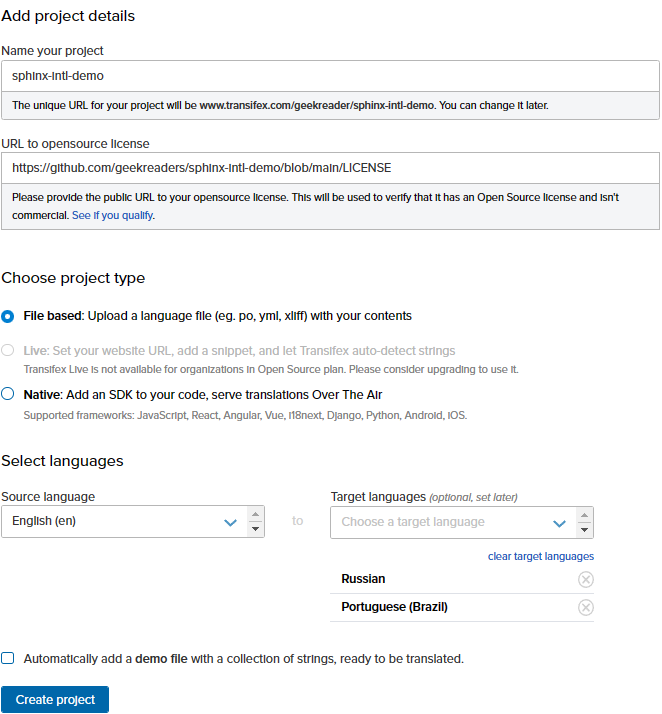
Adding a new project
Click Create project to finish adding a project.
Integrate Transifex and GitHub
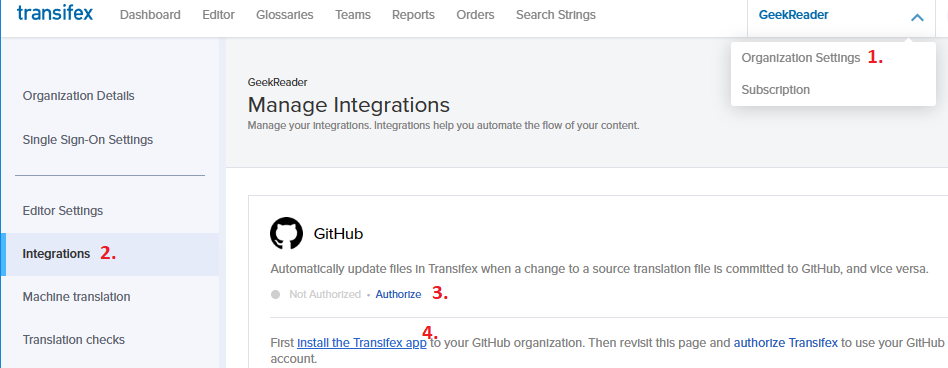
Integrate your Transifex and GitHub accounts as described in the Transifex documentation:
Go to your organization settings -> Integrations.
In the GitHub integration box, click Authorize and then Install the Transifex app.
Authorizing GitHub
From the Select repositories drop-down menu, select your demo repository, and then click Install.
Confirm your GitHub password. The Transifex Integration is now installed on your GitHub account.
Get back to Transifex and go to your organization settings -> Integrations.
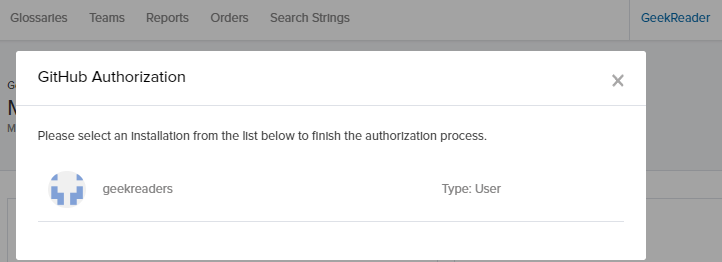
In the Github integration box, click Authorize and then authorize Transifex.
If Transifex requires some permissions, click Authorize Transifex Integration.
Finish integration by clicking your GitHub account name in the list of available installations.
Final step of integration
Your demo repository should now be authorized on Transifex.
Link your Transifex project with GitHub
Link your project with your GitHub demo repository as described in the Transifex documentation:
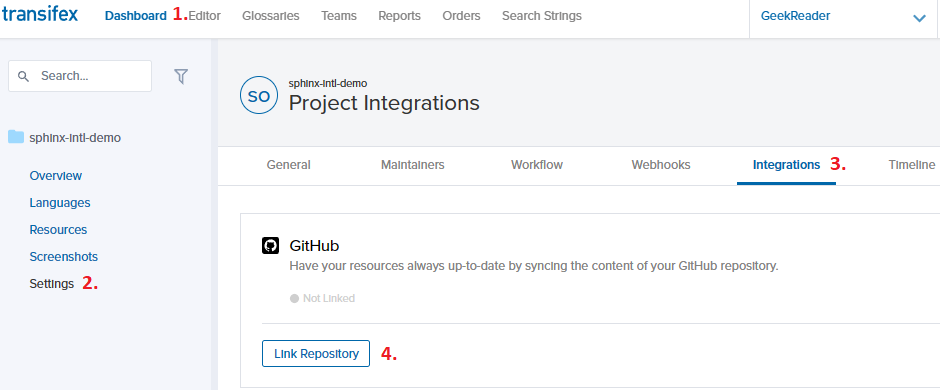
Go to your project settings -> Integrations.
In the GitHub box, click Link Repository.
Linking repository
On the Select repo tab, specify main as the branch name, then click Validate.

Validating branch
Click Next.
On the Select Files tab, you need to specify the name of the YML configuration file that defines how the integration works. If you have created your repository from the demo template, transifex.yml is already there. Otherwise, create transifex.yml in the root of your repository and put the following content in it:
git:
  filters:
  - filter_type: dir
        file_format: PO
        source_file_extension: pot
        source_language: en
        source_file_dir: zen/_build/gettext
        translation_files_expression: 'zen/locale/<lang>/LC_MESSAGES'
Here, we tell Transifex to take source .pot files from zen/_build/gettext and to put translated .po files to zen/locale/<lang>/LC_MESSAGES, where <lang> is a language code (in our project, it’s either ru or pt_BR).
When the transifex.yml file is in the root of your repository, on the Select Files tab, click Apply.
Click Next.
On the Sync Content tab, select 100% reviewed and Create a Pull Request.
Click Save & Sync.
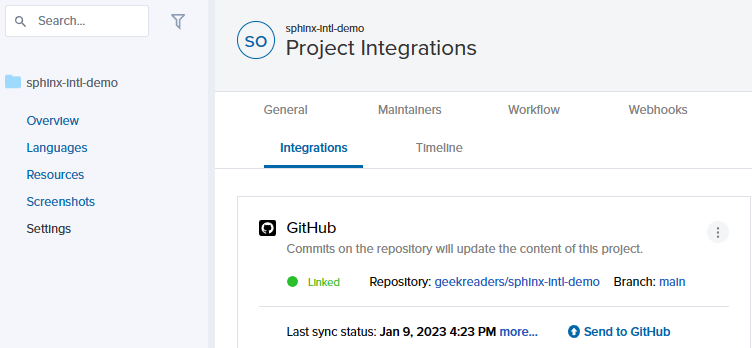
Your Transifex project is now linked with your GitHub repository.
In Project Integrations, you will find the status of synchronizing source files.
GitHub repository linked
Translate files in Transifex Editor
To translate easter-egg.po into Portuguese:
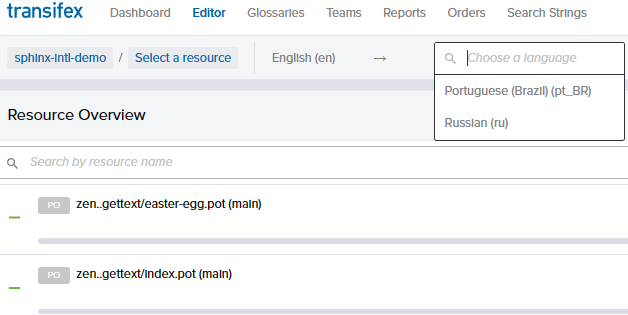
Go to Transifex Editor by clicking Editor at the top of the page.
From the target language drop-down menu, select Portuguese (Brazil).
Selecting target language
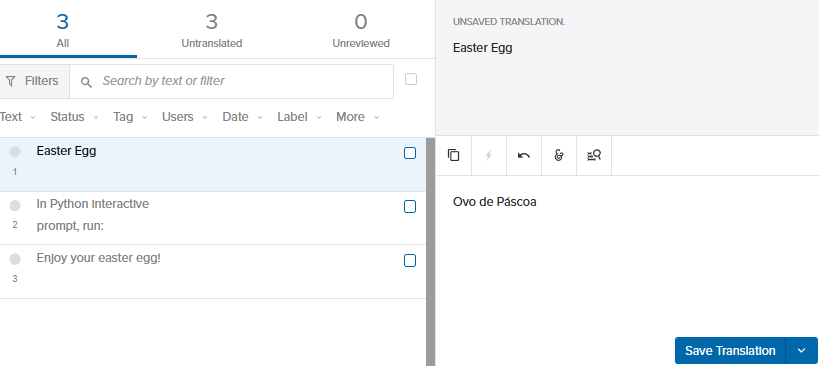
In the Resource Overview list, click zen…easter-egg.pot(main). Transifex Editor opens.
In the strings list on the left, click Easter Egg. Put the translation for this string (Ovo de Páscoa) into the translation area on the right.
Transifex Editor
Click Save Translation.
Repeat for two other strings.
Select all the translated strings by clicking the grouping checkbox on the left. In the Bulk actions panel on the right, select Reviewed from the Mark as drop-down menu, and then click Apply.
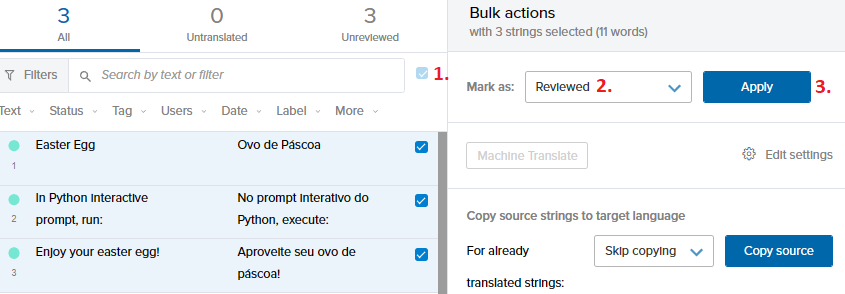
Applying Reviewed status to all strings
All the strings in easter-egg are now translated and reviewed.
Merge pull request on GitHub
Once one of our resources is fully translated and reviewed, Transifex automatically sends it to GitHub by creating a pull request. You can find the information about it on the Project Integrations page.
To merge the pull request:
On GitHub, go to your demo repository Pull requests.
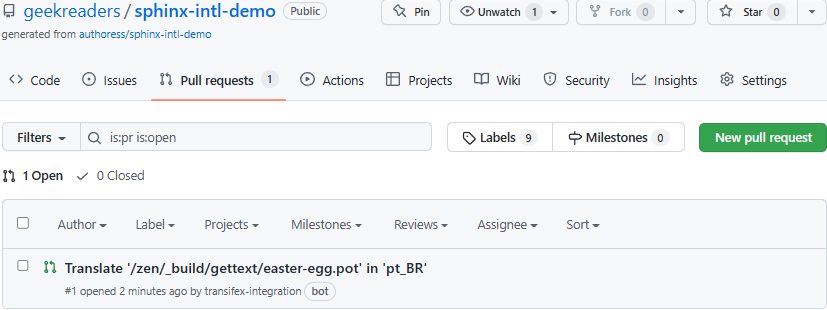
Pull request from Transifex
Click the pull request name. The format of pull request names from Transifex is
Transifex '<path to the source>' in '<language code>'.On the Files changed tab, check that all the translated strings are correct.
On the Conversation tab, click Merge pull request, then Confirm merge.
After the pull request is merged, you can delete the branch.

Deleting branch
Now all the texts in .po files are translated.
You can pull the newly translated .po file from GitHub (by using git pull) to build your documentation locally.
